
We have some goals to complete this month but, we are now not planning to remove the ICE until next month. We have a lot of background research and development to do first and it makes sense to enjoy driving the MX-5e in this great weather 😎
These items have been moved out to October/November now. The car will be SORN'd and the 1.6 petrol engine removed next month, to make these jobs much easier:

The MX-5e is using the ThunderStruck Motors Vehicle Control Unit (VCU) and this has a 3-position FNR (forward, neutral & reverse) switch, with a 10KΩ resistor to 'signal' back to the VCU (5V dc). We are replacing this with a 2-pole, 3-way rotary switch and a large chunky, 3D printed 'gear selection' knob.
Rob took the MX-5e out for a drive with Ethan in Yoko today and the indicators on the left side were not working, so he had to abandon the trip and start doing some diagnostics. We have had a few issues with these in the past but, thought we had fixed the problem. We have to modify the flasher module anyway, to allow us to replace the standard bulbs with LED equivalents and also keep the right flash rate. So this seemed like as good a time as any to try and diagnose the issue and modify the flasher unit at the same time.
We started by testing the indicator switch on the steering column. It is easy to unplug the 3-pin connector and short the centre pin to the others to activate the indicators. This proved that the column switches were not the problem.
We then removed the plug on the flasher unit and tried powering up the indicator circuits with another 12V battery. This revealed that the wiring to all the bulbs was good too and so this means that the flasher module is the culprit. This is not good as they are expensive to replace (about £80).
We ran out of time to diagnose the issue with the flasher unit yesterday, so came back to it this morning.

The flasher module is this grey box, bolted way up inside the dash behind the steering wheel. It sits on a metal bracket with another black module.
The black plastic end plate hods the PCB in with two small plastic locking tabs. The PCB can easily be removed using a small screwdriver, to flex the locking tabs slightly.

I wondered what the black timer/buzzer module fixed to the same mounting bracket was. It turns out that this is the seat belt warning buzzer.

To get a constant flash rate regardless of load, you need to remove R1 (5.6kΩ) and replace it with a 1MΩ resistor.

The flasher module looks like this once modified. I tested it and it gave a constant flash rate, even when a bulb was removed but, the left side indicators bulbs were now not working at all despite the flasher unit operating correctly. This implies an electrical connection issue somewhere.

A visual inspection of the flasher unit PCB showed a dry and cracked joint. This was resoldered and the unit tested again. It worked! 😎 We now the indicators on both sides of the MX-5e working correctly and are ready for any LED bulb upgrade too.

We have a few more deliveries today. The first was some blade fuse boxes. We are using these for all the new wiring we are adding to the MX-5e and we are also slowly migrating all the wiring to these new fuses. The plan is to rebuild the whole wiring loom, so that it is much tidier and lighter. We are also stripping out all the stuff we no longer need.

We also received the coolant temperature sensor housings, so we can test the cooling system for the Nissan Leaf motor. We are planning to bench test it before we try fitting it into the car.
I caused a bit of a stir in the Mazda MX-5 Owners Club group on Facebook when I asked about swapping over the indicator stalk on the MX-5e from the right side to the left side (to match all our other cars). The Eunos Roadster and NA MX-5 are fairly unique in our experience and it would be nice to keep this consistent across all our cars (Yoko aside). Even after many years of driving Yoko, this still confuses sometimes. It's an easy fix (hopefully), so the plan is to not subject other family members and drivers to this oddity.
Intuitive controls are a big part of the great driving experience we are aiming for. Since we are radically changing many of the instruments and dials in the MX-5e, it makes sense to improve the column controls too. The current plan is to move the lighting controls to a rotary switch (to the right of the steering wheel) and to fit a new indicator stalk on the left side of the steering column.

Designed and 3D printed a mounting plate template for the new 12V fuse holders to go in the MX-5e. As we wire in new stuff, it is wired into this new fuse box, to make the wiring tidier and lighter. We also plan to migrate the older parts of the wiring loom too as we update and restore the car.

In preparation for the bench testing of the Nissan Leaf motor, we have built a temporary cooling system and calibrated the temperature sensors. This enables our Driver Control Unit (DCU) to monitor coolant temperatures at various points and to intelligently control the Tesla water pump speed.

Another evening run up to Orford Quay in the MX-5e. Whilst these trips are done for the driving pleasure, they also allow us to test the mechanics and ergonomics of the car and provide valuable thinking time 🙂
The outside of the car is pretty close to where we want to end up. The last step will be a full respray in metallic black. We have the front and rear LED lights to do and we will also be upgrading the front headlights. The front number plate is going to be moved inside the 'mouth' at the front. In an ICE car this would severely restrict the air flow to the radiator. In an EV, this will not be an issue as much less cooling is required. We already have lots of new rubber seals and new door mirrors to fit too. More supportive seats and 6-point harnesses are also planned.

A fantastic sunset on the route back home and some brilliant driving roads.
On the inside, we are currently working on a whole new wiring loom and new controls & instruments behind the steering wheel, that will work much better in an EV. This includes a new OLED display and a Head Up Display (HUD). The Driver Control Unit (DCU) will enable a personalised driving experience with keyless entry & start. Things like oil pressure gauges, rev counter, etc. don't make much sense in an EV. We are going to leave the current heater controls in place in the MX-5e.

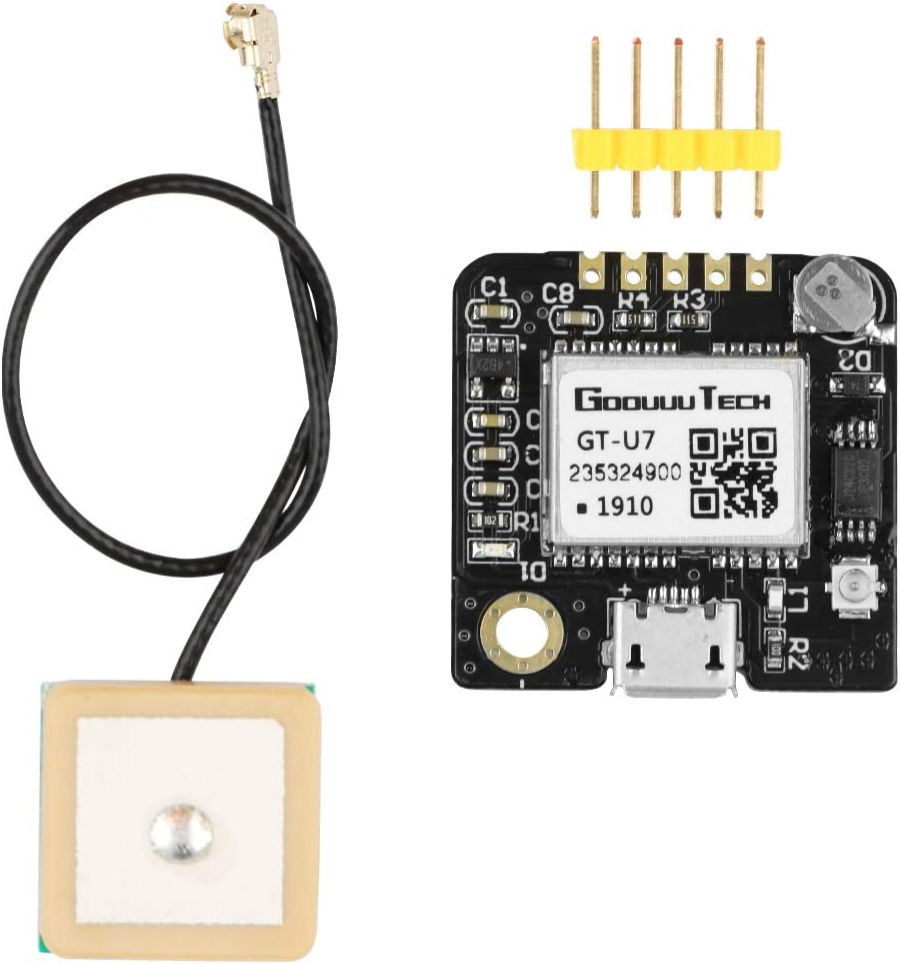
A bit more development on the Driver Control Unit (DCU) today. We now have the GPS module integrated and the MX-5e now has real time location, altitude, GPS speed and time & date information 😎 The digital compass and 3-axis accelerometer come next.

The connectors arrived for the Tesla water pump.

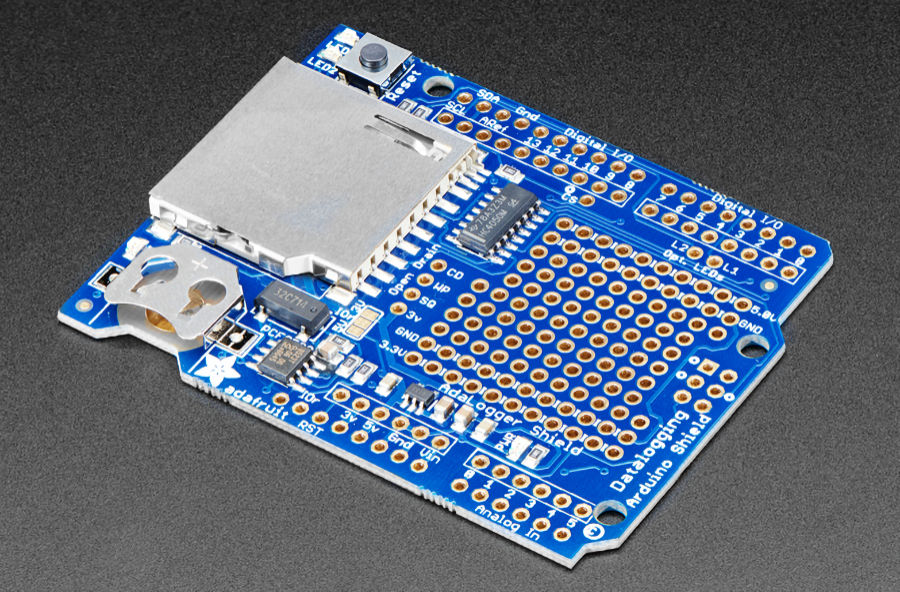
The Arduino processor shield arrived in the post today, to enable our Driver Control Unit (DCU) to support data logging and storage of driver profile data.

Unfortunately, the data logging shield comes with standard SIL headers and we need to piggy-back the IO shield on top of it. This means we need some female long pin headers before we can progress the development of this feature.

The bench testing of the Nissan Leaf motor starts with the cooling system. We got this up and running today, with our Driver Control Unit (DCU) monitoring temperatures and intelligently controlling the Tesla water pump speed.
We learnt a lot about the Tesla water pump and how we can best control it and even monitor its speed. We also learnt that our temporary cooling system design is far from perfect and we need a much better design to automatically purge air from the components.

With the PCB for our vehicle scales delivered today, we could wire it up and test all eight channels. These scales use eight 300kg load cells, which allows us to put two under each wheel of a car and to corner then weight it, with up to 600kg per corner.
With calibration completed, we were able to repeatedly measure the weight of an 11.3kg car battery to within 20g. We will build the measuring plates this weekend and then weigh the MX-5e.
As I mentioned early this month, driving the MX-5e in its current ICE form is giving us valuable thinking time and opportunities to think about the driver profile, driving profile and instruments and controls and controls.
Lots of research and testing in the last few days. We are continuing to develop the Driver Control Unit (DCU) and are looking at using Bluetooth LE for the 'keyless entry and start' feature, to enable an automatically personalised driving experience.

We have been struggling with cardboard templates to get the right shape Perspex for our custom side lights project for the MX-5e, then we had the brainwave of just using the Jass Performance TSI lights on Yoko as a template.

So we bolted a piece of Perspex to one of the lights (forcing it to the right curve) and simply drew around it 🙂

We 3D printed a housing to hold the driving profile switches and LEDs for testing this functionality on our Driver Control Unit (DCU). At the moment we are using coloured LEDs to replace the mode but, these will be replaced by white LEDs behind 3D printed letters. We want to avoid using loads of coloured lighting on the dash, to keep it all intuitive. Orange is for warnings and red is for errors. Each button also has optional audible feedback and this can be anything from a beep to an MP3 file with a voice announcement.

The Perspex for our custom side lights project is now cut and fits perfectly. It was tested on Yoko as she is in our garage at the moment.


There are some great roads on the way to Aldeburgh. With no heater in the MX-5e, it would have been pretty chilly in the car if it wasn't for the heat soak through the center tunnel.

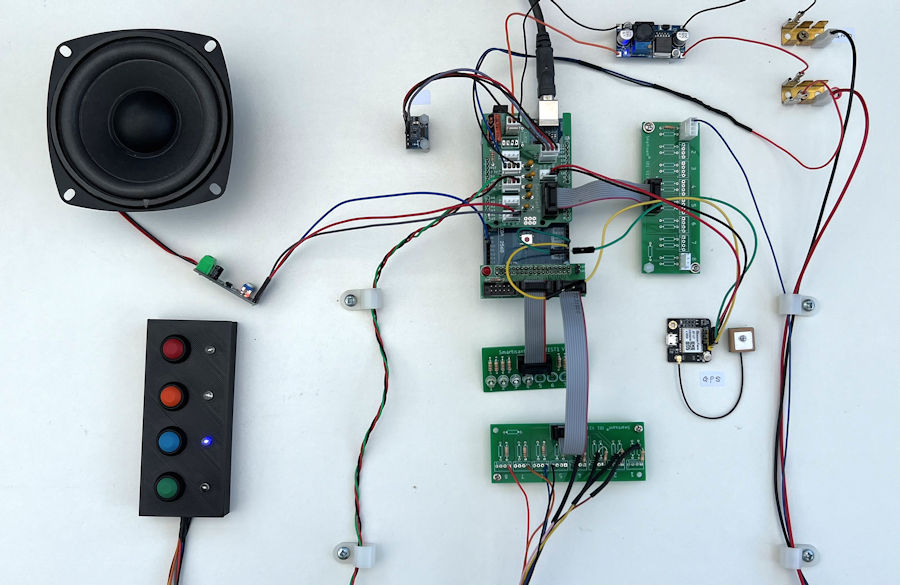
Super busy today, putting all the parts in place to bench test the Nissan Leaf motor. This is the prototype Driver Control Unit (DCU) all wired up and ready for the bench testing.
There is a LOT of functionality in the Driver Control Unit (DCU) and it has been built around an Arduino processor and some other open-source hardware. Rob has done all the programming. The plan is to eventually have it made as a bespoke PCB design with surface mount components.

This is our high voltage wiring for testing the motor. We are using rectified mains power (230V ac) to act as our battery. This means we can only spin the motor gently and without regenerative braking. The Vehicle Control Unit (VCU) handles the precharge side of things.

Loads more progress today but we didn't quite get to the point where we got the motor running. We had loads of little jobs to do in preparation for this. 3D printing switch mounts was one of those jobs, to help tidy up the wiring and test environment.
This afternoon, we focussed on the Vehicle Control Unit (VCU) serial communications and configuration. This involves things like the throttle calibration and responsiveness.

A big step forward today! We now have the Nissan Leaf motor running on our test bench 😎 We have recorded a few videos and you can find these in the media section and on our YouTube channel.

The tool required to finish our vehicle scales arrived, so we now have four weighing plates like this to weigh the MX-5e and all the parts that come out and go in to it.


This morning, we finished putting together all four weighing plates for our vehicle scales.

The first thing we wanted to weigh is the motor/inverter.

This is the output from our vehicle scales. The motor and inverter weigh 65.3kg.

This afternoon, we weighed the MX-5e. Having weighed all the bits we have currently taken off and added, we estimate that the original car weighed 1021.5kg. The current weight is now 987.2kg.

These are the last few days for the MX-5e as an ICE powered car. It will be SORN'd next month and we then completely strip the engine bay, to fit the iBooster and to trial fit the Nissan Leaf motor. The sub frames and suspension will be removed, to be powder coated. The wiring loom is being completely replaced with a new bespoke, light-weight loom. The ECU, cooling system, air-con, exhaust, power steering, heat shields and many other parts will also be removed.
The car is a lot of fun as it is but, it is crying out for more power. The 115bhp (when new) and automatic gearbox will be swapped for 150bhp and 350Nm of torque. The big improvement we are looking forward to will be the instant throttle response at any speed. We already have upgrades planned to get us to 215bhp/400Nm.

The connectors arrived in the post this morning, to allow us to build up the Arduino processor shield that supports data logging and a real-time clock with battery backup. This is part of our Driver Control Unit (DCU) design and we can now store driver profile information and the active driving profile, to deliver a personalised driving experience.
The real-time clock is essential to accurate time-stamping of logs and is updated by the GPS. The SD card used to store data is also used to store audio files and the voice announcements made by the Driver Control Unit (DCU). By the end of the day, we had both the data logging and real-time clock working 😎
January 2025 •
February 2025 •
March 2025
January 2024 •
February 2024 •
March 2024 •
April 2024 •
May 2024 •
June 2024 •
July 2024 •
August 2024 •
September 2024 •
October 2024 •
November 2024 •
December 2024
January 2023 •
February 2023 •
March 2023 •
April 2023 •
May 2023 •
June 2023 •
July 2023 •
August 2023 •
September 2023 •
October 2023 •
November 2023 •
December 2023